Category Archives: Installation

  • 0

Keep Your Soil Moist with Stockosorb®

What is Stockosorb®?

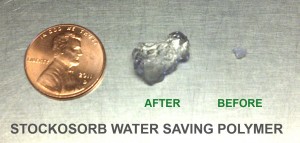
Stockosorb® is a man-made water-absorbing polymer that is designed to improve the capability of soils and other growing media to retain water and plant nutrients. It can be used for the same reasons you would use peat moss mixed in the soil…to retain water near the roots.  Once in contact with water, it will absorb 10 times it weight in water.

How to Apply to Your Soil

We recommend that you add Stockosorb® crystals to your tilled soil using a spreader, AFTER you have added your other soil amendments, and rake it in at about 2″ depth (closest to root level). Do not add water to it until you have laid your sod.

How Stockosorb® Works

Once the Stockosorb® crystals come in contact with water, they will capture water that would have otherwise been lost into the aquifer. They will expand to hold up to 10 times their weight in water and keep the captured water at the root level of the sod. This means that the next time your grass is thirsty, it will “drink” from the water absorbed by the Stockosorb® first, allowing you to save on water usage.

Stockosorb® crystals remain in the soil for 7-10 years (dependent upon soil conditions, etc).

You can also use Stockosorb® when planting trees, plants, in potted plants and gardens, and even in your indoor plants.  Just be careful, as a little bit goes a long way!

Please call us for any more information.

505-832-4247


  • 0

Caring for Your Turf Grass

WATERING

Water the sod immediately after installation until it’s completely soaked, but not puddled ABOVE the sod. Initially, apply at least 1″ of water so the soil underneath is very wet. Pull back a corner of sod to verify your watering is penetrating the underlying soil. Make sure the water is getting to all the areas of your lawn and no corners or edges are missed by your sprinklers. Weather conditions will dictate the frequency and amount of water to apply. It is critical to keep the underlying soil moist for two weeks or until your turf is well rooted.

As the turf becomes more established, begin deeper, less frequent water applications to promote deeper rooting and hardier turf.

Be sure your new turf grass has enough moisture to survive hot, cold, dry and windy conditions. Generally speaking, as the root system grows deeper, irrigation frequency should be reduced.

GENERAL RULES FOR ESTABLISHING NEW TURF

WEEK 1 – 7AM + 11AM + 2 PM

If the soil remains moist and absolutely no turf wilt is observed, eliminate the 11:00 watering.

WEEK 2 – 7AM + 2PM

If the soil remains moist and absolutely no turf wilt is observed, eliminate the 2:00PM watering.

WEEKS 3 & 4 – 7AM

If the soil remains moist and absolutely no turf wilt is observed, water every other day.

Eventually taper back to once every two or three days.
Adjust according to weather and season – water more frequently during warm or dry weather.
Turn off water if it’s windy, as the water evaporates at a much higher rate.
Do not water sod between 8 PM and 4 AM, as this can promote turf disease.

FOOT TRAFFIC

During the first couple of weeks after installation, keep traffic off your newly planted turf grass as much as possible. Your new turf grass needs time to firmly knit the roots with the soil. If you have properly watered your newly-laid turf grass, it will be moist and soft. Traffic will create indentures and destroy your smooth grade.

TROUBLESHOOTING

If DRY SPOTS appear in the lawn during the afternoon, the irrigation time should be increased. If dry spots persist, an irrigation uniformity problem is likely, and an additional sprinkler head may be required.

BROWN LAWN areas are most commonly caused by one of three types of problems: Improper watering, burn, or disease. Check for watering and burn problems first before treating for disease.

BROWN SPOTS caused by a burn will result from pet urine, over-fertilization, gasoline spills, etc. Burn spots are distinguished from other types of damage by their “total kill” straw-yellow color. If a burned area is thoroughly flushed with water in the early stage of damage some recovery may occur. Otherwise reseeding or sodding may be necessary. However, with bluegrass, if you are patient, the area will fill itself in. It will just take some time. With fescue, overseeding or re-sodding will be necessary, as it will NOT fill itself in.

To check for LACK OF WATER use a screwdriver or knife to probe the brown areas of your lawn as well as the healthy green areas. If the brown area is more difficult to penetrate then a lack of water is likely. This is usually the result of poor sprinkler spacing or sprinkler malfunction. Saturate the area with a hose as soon as possible and continue to provide supplemental water until the sprinklers are repaired.

EXCESS WATER can cause turf to die by suffocating the plants roots or rotting its crown. This generally occurs in low spots or shady areas. Check for muddy soil, algae crusts, or slimy rotting grass. To correct problems in the shade, reduce irrigation time to that area or replace the sprinklers with lower volume heads. Low spots must either be raised or set up to drain. A French drain might need to be installed, which can be done by local landscape contractor.

DISEASES are almost always related to heat and moisture. However, poor irrigation practices can also promote disease development. The longer moisture stays in the turf foliage the greater the disease risk. Therefore, do not water at night, (between 6 pm and 4 am) since the lawn will stay wet until morning. It is best to irrigate between 6 am and 8 am. Early morning watering reduces evaporation.

  • 0

Step-by-Step Sod Installation Instructions

1. Rake and remove all rocks, sticks and debris from surface area of the soil.


2. Add peat moss to soil.

This will retain water to feed back to the sod, as well as loosen the current soil structure. For heavy sand or clay soil, a soil amendment such as a new nutrient-rich compost or top soil, is recommended. (Note: Some top soils contain certain amounts of peat moss already. Too much peat moss will make your new lawn very “spongy”.

For maximum water savings, add our Stockosorb polymers to your soil. They absorb many times their weight in water and redistribute the water in a slower time-release process (1 teaspoon absorbs approximately 8 oz. of water. 1 lb. covers approximately 200 sq.ft.)


Installing Sod

3. Roto-till the soil to a depth of 6-8 inches.

Rake again to remove additional rocks, sticks and debris that have been brought to the surface. A wide-tooth rake is excellent for this process.


4. Rake to form a smooth surface.

An iron rake works great for this. Soil compaction should be firm enough that that it will not sink or compact after the sod is laid and watered. However, it should not be too firm so that roots will not be able to work their way into the soil. The best way to test this is to walk across the soil. It should feel spongy underfoot, but not leave a very deep footprint behind. Sod should be laid on a lightly damp soil surface, so water the roto-tilled soil slightly, but make sure it’s not soggy.


5. Level to fill low spots.

Leave soil 2 inches below any cement, flagstone, walks and driveways.  This will allow for the thickness of the sod roll, so that you will not have sod higher than their neighboring surfaces. Level ground 1-2 inches below sprinkler heads also.  Slant the sod bed slightly away from the house/building to allow for proper drainage.


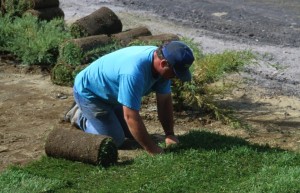
6. Begin the sod laying process along a straight edge such as a walk, patio or driveway. Lay sod horizontally with the house or street. For irregular or oval patterns, use 2 stakes with a string tied between to develop a straight edge. Using a straight edge for a guide will save you from wasting sod, not to mention less time cutting the sod.


7. Butt edges of sod together tightly to promote rapid knitting of edges and lay the sod in a staggered brick pattern. This will make the seams less noticeable. Use a sod knife (recommended) or a serrated knife to cut around trees, irregular borders and other areas.


8. Lightly fertilize the day of sod installation.

We recommend our fertilizer mixture, as it has been specifically designed for us and our New Mexico sod. A 50 lb. bag will cover approximately 7000-7500 square feet, which should last approximately 4-6 applications. Fertilizer should always be watered into the lawn immediately after application to avoid burning the sod.


9. Water sod heavily and thoroughly after installation for the first two days.

Thorough watering during the first 48 hours is crucial to the success of your sod. Water heavily enough to see water on the ground surface, but not standing water. This should be done 3 times per day for the first 2 days.


10. Water thoroughly every day for this first 10-14 days, but do not flood after the first 48 hours. After the 14th day, gradually reduce watering to every other day for a week. After 21 days, you should be able to determine if your sod will need more or less watering based on it’s response to your watering cycle. Check our Water Saving Advice to learn how to measure the amount of water your specific irrigation system distributes, as all irrigation systems differ.


11. Fertilize lawn 4-6 weeks after installation.

Fertilizer should always be watered into the lawn immediately after application to avoid burning the sod.


IMPORTANT INFORMATION

  • Foot and pet traffic should be kept to a minimum the first two weeks.
  • Two weeks after sod installation a majority of the roots will be bonded to the soil below.
  • Three weeks after installation, the seams should start to disappear.
  • Our turf blends should be fertilized 4 times per year: early March, late May, early September and late October.


  • 0

Yes! You CAN Plant Sod All Year Round!

We are often asked questions regarding how long we will cut sod, when it’s available, when we stop cutting for the year, or if it’s a good time to plant, and similar.

  • We cut sod and have it available ALL YEAR ROUND (as long as the ground isn’t’ frozen or snowed upon, which doesn’t happen too often here in the Southwest).
  • We never stop cutting sod (again, only if the ground is frozen).
  • Sod can be planted ALL YEAR ROUND, even when dormant.
  • Planting sod ALL YEAR is perfectly fine in Albuquerque and the nearby surrounding region with similar elevations.


  • 0

Should I Seed or Sod My Yard?

The lush, beautiful lawn you desire can be achieved through a variety of methods. Seeding and laying sod are two of the most common options, and if installed and cared for properly, either option can provide you with the lawn of your dreams.

There are many differences between choosing to seed or lay sod, but the end result is usually the same, as well as the maintenance level after established.

Seeding

Pros:

  • Establishing turf from seed requires less labor to install, but more care during the germination and establishment stages.
  • The initial investment is less, because you are not paying for the 18-24 months farm labor to grown turf ready to cut for sod rolls.
  • More selection of turf seed can be found than sod types.
  • Faster installation than rolls of turf.
  • Difficult areas can be successfully seeded.
  • High quality seed will yield higher quality results.

Cons:

  • Needs more “baby sitting”.
  • The amount of time accomplish the final result…a lawn you can use.
  • Traffic should be kept completely off a seeded area until it is at least 2″ tall.  Even then, it should be mainly undisturbed, since foot traffic, pets, etc., can easily destroy tender seedlings.
  • Frequent watering during germination. The ground should be kept moist during the entire germination process.
  • Seed cannot be planted all year long (sod can, if the ground isn’t frozen). It does not germinate below a certain temperature, and has a hard time germinating in the summer heat.
  • Weed control during establishment stage is necessary.
  • Erosion is more likely to happen to a seeded area vs. a sodded area. Even if it rains once during the germination process, the pattern can end up very patchy and may need to be over-seeded several times.
  • Low quality seed will yield low quality results.  Many seed mixes you find at a big box store are not even designed for the area you live in. These low quality mixes often contain weed seeds, have low germination rates, and could contain grasses that you do not want. Seeding rates may be difficult for the average person to calculate, and when incorrect can have a negative impact on seed germination. An NTEP rated variety, which means it has been independently evaluated and rated by the National Turf Evaluation Program, means these selected grass seeds have been specifically bred for superior green grass color, disease and insect resistance and drought tolerance.

Tips for Seeding

Use top quality seed. Ask about germination rates. Grade 1 is better than Grade 5.

Using a spreader will ensure you get the proper coverage of seed. Too much coverage of seed can cause the seed to compete with each other. Too little and you will have bare spots. A spreader will work perfectly.

Don’t seed in the hot summer months. Seeds have to compete with usual summer weeds, and do not germinate well in heat and inadequate moisture during the summer. Spring and fall are usually the best times to lay seed.

Planting seed too deep will not allow it to germinate.  Laying seed and covering with about 1/8th inch of topsoil is plenty to start germination.

Sodding

Pros:

  • Instant lawn
  • Can be walked on within days of planting.
  • Instant erosion protection.
  • Great for sloped areas or erosion-prone areas where seed would have difficulty surviving.

Cons:

  • Higher initial cost.
  • To establish you will need to use a larger volume of water than after established.
  • Requires a lot of manual labor to install.

Tips for Sodding

Choose fresh, healthy sod. You don’t usually find quality sod in the big box stores.

Proper soil preparation is one of the most important steps prior to sodding. The optimal soil will be a loamy mix, therefore clay type soils will need amendments such as compost and peat moss.


  • 0

How to Request Info on Sod & Other Products

When requesting more information or pricing through our website, we would just love if you used our Quote/Info Request form, rather than posting a “comment” to our website posts. This way we receive your request via email, and you will get a timely response.

Thanks for helping us help you better! :)

Click here for the Quote/Info Request form.


Site Categories